KEDA On AKS: Deep Dive

Performance, scalability, and redundancy is continuing to be drastically crucial for every organization and enterprise, both big and small. It's the make or break between people using an application and people going to the competition.
It's also the difference between 2:00 AM wake-up calls for SREs and automation that takes care of the workloads, ensuring that cognitive load isn't at its peak.
In this technical deep-dive, you'll learn what KEDA is, how to install it, how to manage it, and how to scale workloads with events.
Why KEDA
Kubernetes Event-Driven Autoscaling, or KEDA for short, is to scale containerized workloads based on particular events that occur within the application.
The overall goal with KEDA is you need a particular "thing" to happen based on a particular "thing" that occurs (I know, very technical explanation).
Let's dive into it a bit more.
Say, for example, purposes, you're an engineer for an eCommerce site. With an eCommerce site, there are going to be some days and times that are far more busy than others. Cyber Monday is a great example of a day when the eCommerce site you're managing will get hammered. Because of that, you know that scalability on Cyber Monday will be drastically important. More Pods, more CPU/memory per Pod, and quick response times based on the traffic to the website. You could set up a cron job in KEDA that states what time you want resources to increase, how many Pods should be running, and when the application stack should scale back down. Maybe for Cyber Monday, you scale the Pods that run the eCommerce website up to 10, and at 12:00 AM, you scale them back down to the normal amount of running Pods.
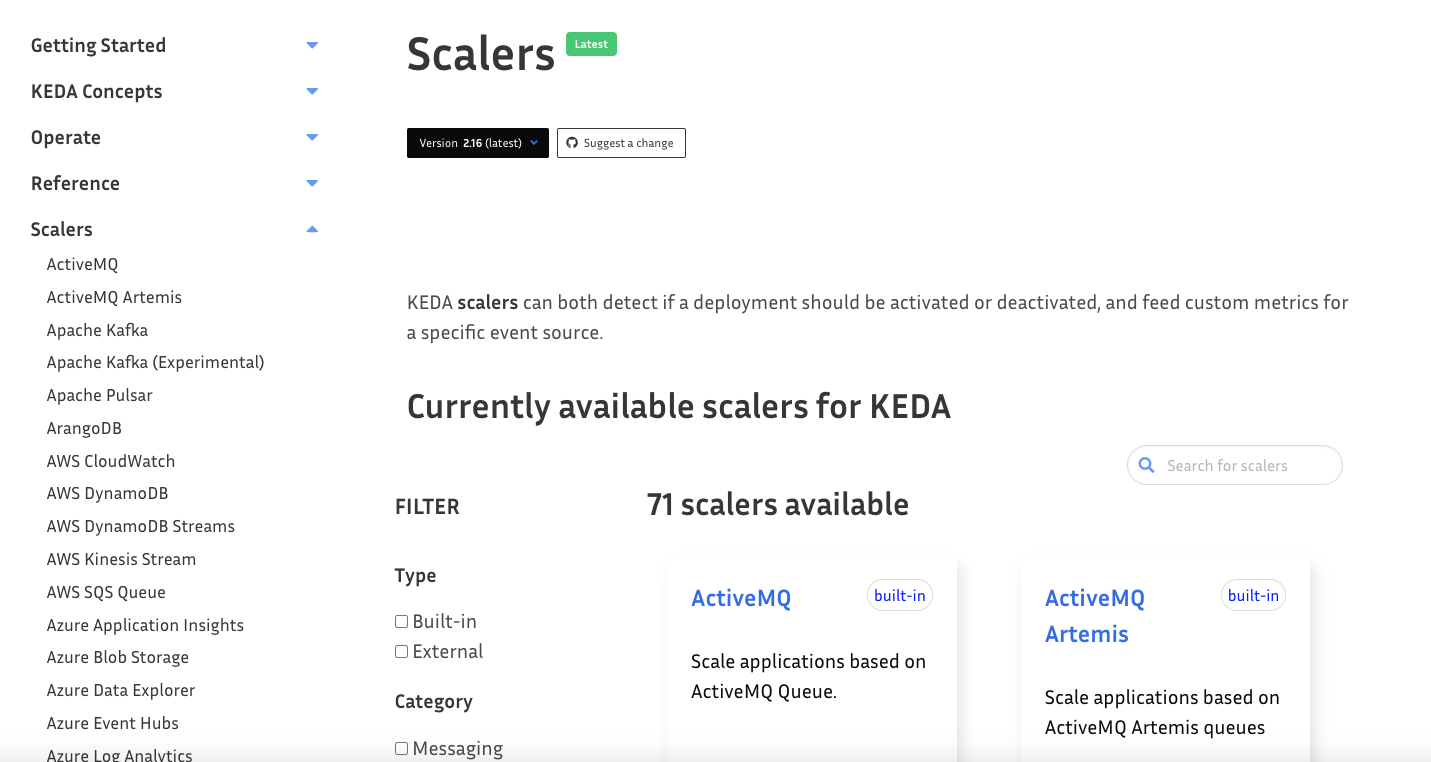
A Cron Job is just one method. There are currently (at the time of writing) 71 scalers, which you can find here.
Now that you've gone through some theory and have an understanding of why you'd want to use KEDA, let's dive into the technical aspect of setting it all up.
Cluster Configuration
To use KEDA on Azure Kubernetes Service (AKS), you'll of course need a running AKS cluster. If you don't already have one, the following Terraform configuration will help get one deployed for you.
First, create two files:
main.tfvariables.tf
Within the main.tf, copy/paste the below config which contains:
- The Azure provider
- The AKS resource
terraform {
  required_providers {
    azurerm = {
      source  = "hashicorp/azurerm"
    }
  }
}

provider "azurerm" {
  features {}
  subscription_id = var.sub
}

resource "azurerm_kubernetes_cluster" "k8squickstart" {
  name                = var.name
  location            = var.location
  resource_group_name = var.resource_group_name
  dns_prefix          = "${var.name}-dns01"

  kubernetes_version = var.k8s_version


  network_profile {
  network_plugin = "azure"
  network_policy = "azure"
}

  default_node_pool {
    name       = "default"
    node_count = var.node_count
    vm_size    = "Standard_A2_v2"

  }

  identity {
    type = "SystemAssigned"
  }

  tags = {
    Environment = "Production"
  }
}
Next, copy/paste the below config which contains all of the variables you need for a successful deployment based on resource group, name, region, node count, Kubernetes version, and subscription.
variables.tf variable "name" {
type = string
default = "aksenvironment01"
}
variable "resource_group_name" {
type = string
default = "devrelasaservice"
}
variable "location" {
type = string
default = "eastus"
}
variable "node_count" {
type = string
default = 3
}
variable "k8s_version" {
type = string
default = "1.31.2"
}
variable "sub" {
type = string
default = ""
}You should now be able to run the following commands within the directory that you saved the main.tf and variables.tf:
terraform initterraform planterraform apply
If you don't want to use Terraform, you can deploy via your own method. Here's the link to all of the AKS cluster creation methods. https://learn.microsoft.com/en-us/azure/aks/learn/quick-kubernetes-deploy-portal?tabs=azure-cli
Deploy The App
An AKS cluster is now deployed, which means you can focus on getting your application deployed. The application that you choose to use is entirely up to you as it doesn't impact the KEDA configuration.
For example, you can deploy a Nginx Deployment via the nginx:latest container image found on Docker Hub. You can also deploy your own application.
For the purposes of testing this out myself, I deployed a Python application that I wrote and stored in Azure Container Registry (ACR).
apiVersion: apps/v1
kind: Deployment
metadata:
  name: pyweb
spec:
  selector:
    matchLabels:
      app: pyweb
  replicas: 1
  template:
    metadata:
      labels:
        app: pyweb
    spec:
      containers:
      - name: pyweb
        image: devopsthehardway.azurecr.io/pywebamd:latest
        ports:
        - containerPort: 5001
---
apiVersion: v1
kind: Service
metadata:
  name: pyweb
spec:
  selector:
    app: pyweb
  ports:
    - protocol: TCP
      port: 8080
      targetPort: 5001
  type: LoadBalancer
If you don't have your own containerized application, you can use the following example: https://kubernetes.io/docs/tasks/run-application/run-stateless-application-deployment/
Once your application is deployed, you can confirm it's running successfully.
kubectl get pods --watchNow that you have a running app, let's dive into how KEDA is installed.
KEDA Installation Methods
There are a few different solutions for getting KEDA up and running on your AKS cluster.
With Helm:
helm repo add kedacore https://kedacore.github.io/charts

helm repo update

helm install keda kedacore/keda --namespace keda --create-namespace
With the Azure CLI for an existing cluster:
az aks update --resource-group your_rg_name \
--name your_existing_cluster_name \
--enable-keda
With the Azure CLI while creating a new cluster:
az aks create --resource-group your_rg_name \
--name your_new_cluster_name
--enable-keda
Considering you created an AKS cluster in the previous sections, you can use the existing cluster option.
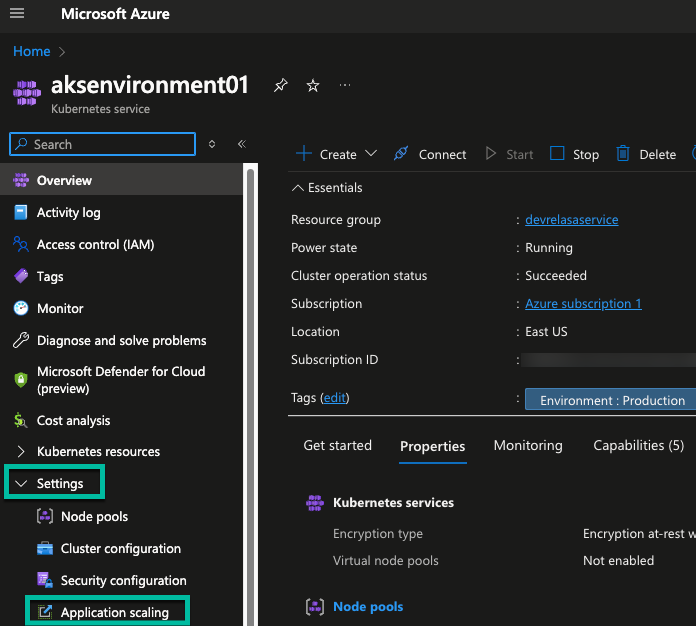
You can also implement KEDA via the Azure Portal with the click of a button. If you navigate to your AKS cluster and go to Settings > Application scaling, you'll see a blue button that you can click to enable KEDA.
Implementing KEDA Via The Azure Portal
In the previous section, you learned about four (4) programmatic ways to implement KEDA, all of which work great.
Now that KEDA is enabled/installed on your cluster, let's dive into how you can turn an application running within your cluster into an event-driven workload.
- Navigate to your AKS cluster and go to Settings > Application scaling.
- You'll be greeted with a screen, once you click the blue + create button, that allows you to put in all of the information you need to ensure your application is event-driven. This information includes:
- The name of the app.
- Which Namespace it's in.
- The workload/app itself.
- Interval times.
- Min and max replicas - ENSURE you set these to be different than the current replica count. For example, if you're running two Pod replicas and you put the max replica count on the cron job as 2, you won't see a change in your workloads.
- Trigger details.
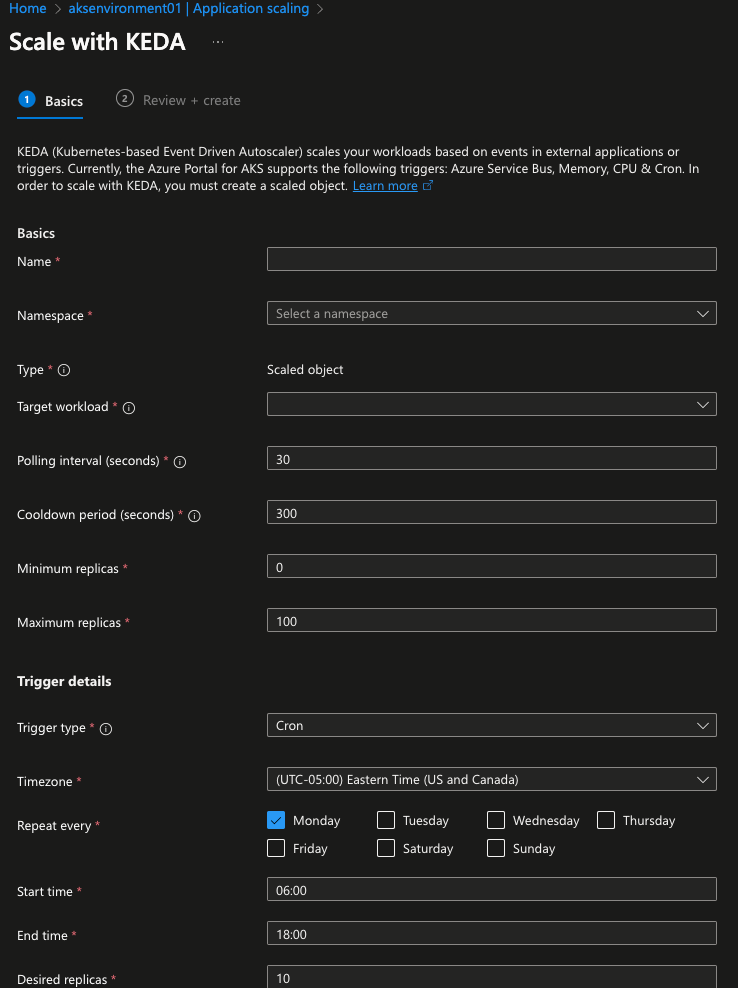
- Within the trigger details, you can see various types. For the purposes of this blog post, choose the Cron type.
- To properly test out the Cron Job, specify a day and time. For the time, I usually put it 2 minutes in the future.
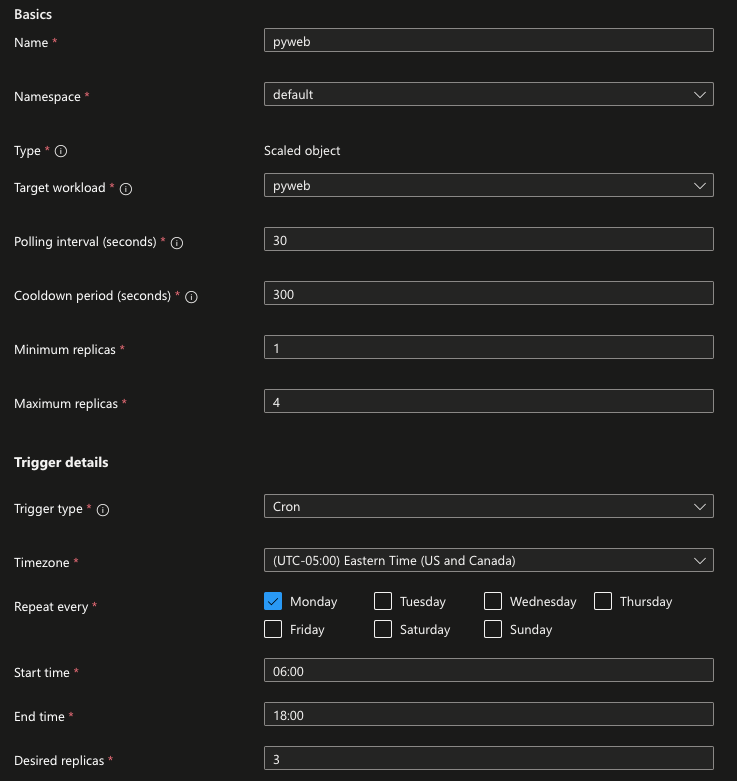
- Once you save the Cron Job, you'll see the new cron job with the name you gave it.
- Head over to your cluster and run the following command to see the scale occur.
kubectl get pods --watchAfter a minute or two, you should see new Pods getting created automatically.
Deploying KEDA Workloads Via A Kubernetes Object
In the previous section, you learned how to create the Cron Job manually via the Azure Portal. Let's now dive into how to do the same thing automatically.
Create a new Kubernetes Manifest and call it scale.yaml.
The below Kubernetes Manifest is what you want to copy/paste into save.yaml. It utilizes the KEDA Operator and within the Operator, the object/kind/resource is ScaledObject.
You'll want to edit the scaleTargetRef to target your application. For example, you can see that the below has a Deployment object with a Deployment name of pyweb.
apiVersion: keda.sh/v1alpha1
kind: ScaledObject
metadata:
  name: pyweb-cronjob
spec:
  scaleTargetRef:
    apiVersion: apps/v1
    kind: Deployment
    name: pyweb
  minReplicaCount: 1
  maxReplicaCount: 4
  triggers:
  - type: cron
    metadata:
      timezone: America/New_York
      # Timezone codes: https://en.wikipedia.org/wiki/List_of_tz_database_time_zones
      start: 0 6 * * * # At 6:00 AM
      end: 0 20 * * * # At 8:00 PM
      desiredReplicas: "3"
Run the file on your local terminal with the following command:
kubectl apply -f scale.yamlYou should see an output similar to the one below.
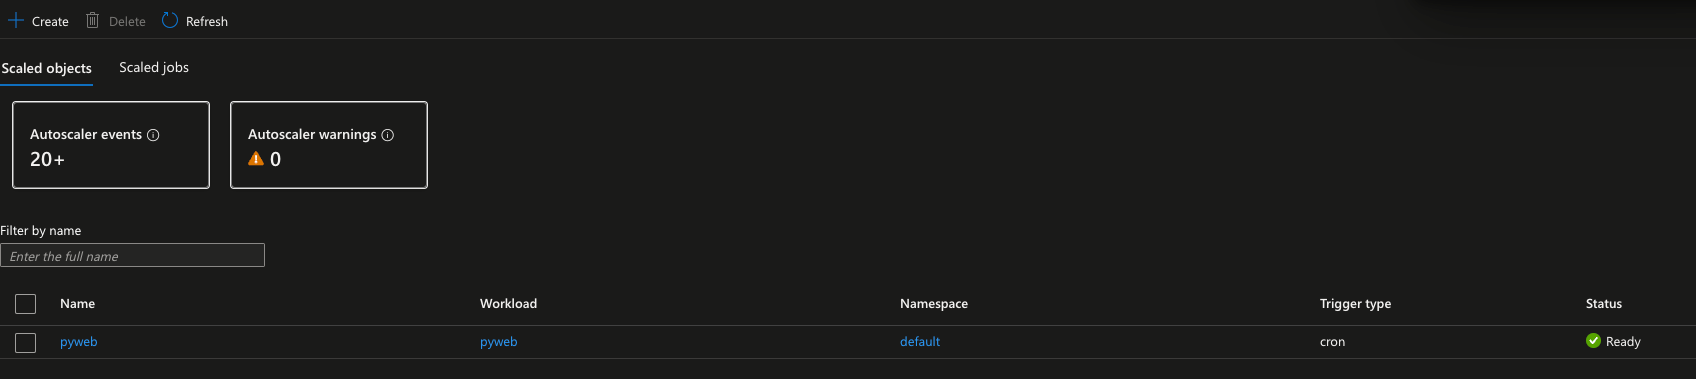
scaledobject.keda.sh/pyweb-cronjob createdYou can check that the Kubernetes Manifest deployment worked by checking the scaled objects.
kubectl get scaledobjects
Deploying KEDA Workloads In CICD
The last thing to chat about is automating the automation. In the previous section, you learned how to create a Kubernetes Manifest with the same configurations you used in the section where you used the Azure Portal to create the cron job. The question then becomes "What if I don't want to run a bunch of kubectl apply -f commands on my local terminal because it's not scalable".
You can use CICD for this purpose.
There are a lot of CICD tools, so for the purposes of this blog post, you'll see one used that just about everyone has access to - GitHub Actions.
The GitHub Action below does the following:
- Uses two environment variables to point to your Resource Group and AKS cluster.
- Uses Azure Credentials to authenticate to Azure via GitHub Actions.
- Uses an Ubuntu Runner.
- Installs
kubectlon the Runner. - Sets your AKS cluster in the current context.
- Runs the Kubernetes Manifest that you created in the last section.
You'll need to configure the path to the Kubernetes Manifest and the environment variables to match your environment.
name: KEDA Cron Job
on:
workflow_dispatch:
env:
RESOURCE_GROUP: "devrelasaservice"
CLUSTER_NAME: "aksenvironment01"
jobs:
deploy:
name: deploy
runs-on: ubuntu-latest
steps:
# Checks out the repository this file is in
- uses: actions/checkout@v4
# Logs in with your Azure credentials
- name: Azure login
uses: azure/login@v1.4.6
with:
creds: ${{ secrets.AZURE_CREDENTIALS }}
# Use kubelogin to configure your kubeconfig for Azure auth
- name: Set up kubelogin for non-interactive login
uses: azure/use-kubelogin@v1
with:
kubelogin-version: 'v0.0.25'
# Retrieves your Azure Kubernetes Service cluster's kubeconfig file
- name: Get K8s context
uses: azure/aks-set-context@v3
with:
resource-group: ${{ env.RESOURCE_GROUP }}
cluster-name: ${{ env.CLUSTER_NAME }}
admin: 'false'
use-kubelogin: 'true'
# Install Kubectl
- name: Install kubectl
run: |
curl -LO "https://dl.k8s.io/release/$(curl -L -s https://dl.k8s.io/release/stable.txt)/bin/linux/amd64/kubectl"
curl -LO "https://dl.k8s.io/$(curl -L -s https://dl.k8s.io/release/stable.txt)/bin/linux/amd64/kubectl.sha256"
echo "$(<kubectl.sha256) kubectl" | sha256sum --check
sudo install -o root -g root -m 0755 kubectl /usr/local/bin/kubectl
kubectl version --client
# Deploy app
- name: Deploy Argo app
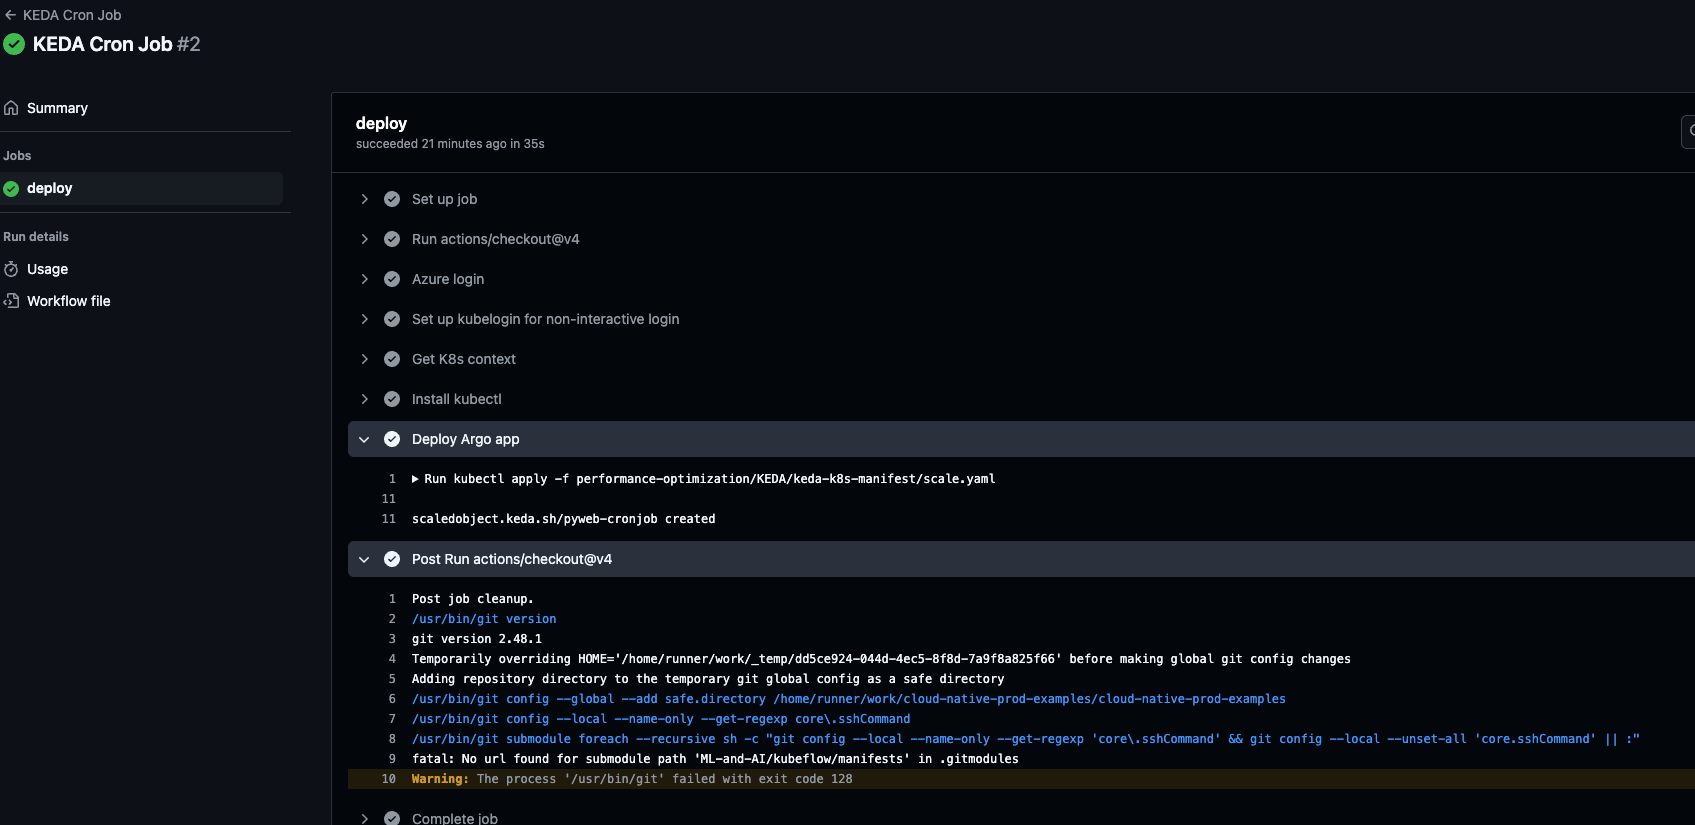
run: kubectl apply -f performance-optimization/KEDA/keda-k8s-manifest/scale.yamlIf the GitHub Action successfully runs, you'll see an output similar to the one below.
Closing Thoughts
It makes more sense than ever to scale workloads based on a particular event that occurs. Luckily, that event could be anything from a scheduled job to a message that comes in via a Service Bus. There's a unique situation for every implementation and with event-based scaling, you'll be covered.


Comments ()