AKS Automatic and AWS EKS Auto Mode: Setup and Deployment

There are three goals for any engineering team, whether it’s a startup, enterprise, or mid-sized organization:
- Move faster.
- Less low-hanging fruit.
- Scalability and integration.
If you think about the innovation that’s constantly occurring, those three things are really what are the constant focus.
When it comes to new iterations of Kubernetes, it’s no different.
In this blog post, you’ll learn about the newest wave of innovation in the Kubernetes landscape - automatic node management.
What Managed Kubernetes Was Supposed To Be
When Kubernetes was first written, it was a ton of bash scripts (like most automation) thrown together to deploy and manage workloads. Fast forward 10 years and it’s one of, or arguably the most, innovative platforms that engineering has ever seen. The way that you can manage the entire environment through a scalable API, and not only manage but extend the API, is a drastic improvement over any systems management done in the past.
However, as with all tech, despite how good it is, people want more innovation. That’s where managed Kubernetes services came into play. But even with managed k8s, engineers and the overall community wanted a more efficient method of managing it all - something that took care of the low-hanging fruit.
That’s what managed k8s was supposed to be, but it only got us roughly 70% of the way there. That’s why EKS Auto Mode and AKS Automatic is such an interesting creation because it truly does get engineers to 100%. All of the management is done by the cloud provider. All engineers have to worry about is the application stack and third-party services that they want to use within Kubernetes.
In short, EKS Auto Mode and AKS Automatic are what managed Kubernetes services were supposed to be.
A key differentiator to point out is that although this is a service/infrastructure that’s “all the way” managed by the cloud provider, third-party services should still work as expected. For example, if you’re using Istio as a Service Mesh, you can use Istio in EKS Auto Mode and AKS Automatic. This is a huge improvement on some of the other “serverless” k8s managed services we’ve seen. For example, with EKS Fargate Profiles, you can install Istio, but you technically shouldn’t (per AWS) due to the technical limitations. The same goes for Azure Container Apps. With EKS Auto Mode and AKS Automatic, however, these limitations don’t exist.
Now that you know a bit about the “why” behind both of these services, the next two sections will be all about configuration.
AKS Automatic Configuration
If you use AKS Automatic, a few things to consider:
- It uses Node Auto-Provisioning, which is Azure's version of Karpenter (it’s Karpenter - Microsoft just named it differently).
- It relies on its own monitoring and observability tools within Azure Monitor.
First, let’s take a look at how to configure AKS Automatic via the UI. Then you’ll see how to do it on the CLI.
The UI
Within Azure, go to the Kubernetes service.
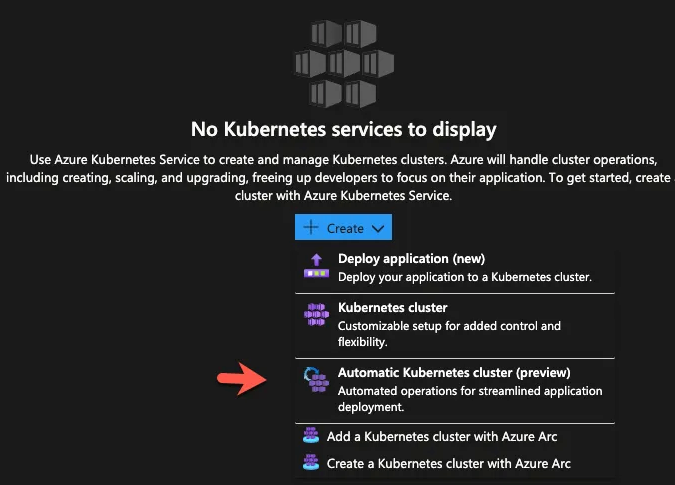
Once you’re in the Kubernetes service, click the blue + Create button.

You’ll see four options. For this blog post, use the Automatic Kubernetes cluster (preview) option.

On the next screen, you’ll see options to configure:
- Which security group you want the cluster to be deployed to.
- The RG.
- Cluster name.
- Region
- Upgrade scheduler
You’ll also notice in the blue box on the top of the screen the services that go into making AKS Automatic possible.

The last page is all about monitoring and observability.

Once complete, click the blue Create button.

After a few minutes, you should see the new k8s cluster running.
The Azure CLI
Now, let’s take a look at how to deploy AKS Automatic via the CLI.
First, add the AKS preview extension if you don’t already have it.
az extension add --name aks-preview
Register the AutomaticSKUPreview feature, which is for AKS Automatic.
az feature register --namespace Microsoft.ContainerService --name AutomaticSKUPreview
Register the provider for container services.
az provider register --namespace Microsoft.ContainerService
You can now create an AKS cluster the same way you would with Azure CLI in general, but this time, you’ll use the automatic SKU.
az aks create --resource-group myResourceGroup \\
--name myAKSAutomaticCluster \\
--sku automatic
Now that you’ve learned how to deploy an AKS Automatic cluster, let’s dive into EKS Auto Mode.
AWS EKS Auto Mode
If you use Auto Mode on EKS, here are a few things to consider:
- It uses Karpenter for node scaling and performance optimization.
- It relies on its own monitoring and observability tools within CloudWatch.
First, go to EKS within the AWS portal and click the orange Create cluster button.

Within the first step, you’ll see two configuration options:
- Quick configuration.
- Custom configuration
The Quick configuration option is for EKS Auto Mode.

Within the cluster configuration, you’ll set up configs for:
- The name of the cluster.
- The k8s version.
- IAM roles.
- VPC.
- Subnet options.

The last step is to show you what you can edit after the cluster is created. For example, you can turn off Auto Mode after you create the cluster if you’d like to go back to the standard Worker Node management configuration.

You can also do the same configuration for EKS Auto Mode with the AWS CLI, Terraform, and CloudFormation.
For example, with eksctl, you can use the following command:
eksctl create cluster --name=clusterName --enable-auto-mode
You can do the same with a YAML config if you want more flexibility and customization options.
apiVersion: eksctl.io/v1alpha5
kind: ClusterConfig

metadata:
  name: <cluster-name>
  region: <aws-region>

iam:
  serviceRoleARN: iamRoleARN

autoModeConfig:
  enabled: true
  nodePools: [general-purpose, system]
  nodeRoleARN: iamRoleForNodes
Closing Thoughts
You may be wondering why this blog post was so short in the sense that the configuration was quick, and, well, that’s the point. EKS Auto Mode and AKS Automatic aren’t supposed to be long and strenuous procedures. It’s supposed to be quick, simple, and efficient, all while keeping the production-level quality.


Comments ()